Thinking about putting the iconic Ghostface character from the Scream movies onto paper? You're in a good spot. Lots of folks find themselves wanting to sketch this instantly recognizable figure, and it's actually more approachable than you might think. This guide is here to help you get started, offering a friendly path for anyone eager to give it a go, whether you're just picking up a pencil or have been drawing for a while, you know.
We'll walk through the process bit by bit, making sure each step feels easy to follow. You don't need a whole lot of special art supplies or prior experience, really. Just a willingness to try and a little bit of patience. It's about enjoying the creative act and seeing that famous mask come to life under your hand, as a matter of fact.
So, if you've ever watched one of those movies and thought, "I could draw that," well, now's your chance. We'll look at the key shapes and lines that make Ghostface so distinct, helping you capture that unmistakable look. It's a pretty fun way to spend some time, too it's almost.
Table of Contents
- The Identity Behind the Mask - Who is Ghostface?
- Ghostface - Character Details
- Getting Ready to Draw - What You'll Need to how to draw ghost face
- Starting Your Sketch - How to Begin how to draw ghost face
- Creating the Head's Basic Shape
- Shaping the Mouth Opening
- Adding the Cloak - How to Draw the Gown for how to draw ghost face
- Bringing it to Life - Adding Details and Finishing how to draw ghost face
- Putting Color on Your Ghostface Picture
- Tips for Your Drawing Journey - How to improve how to draw ghost face
- Final Thoughts on Your Artistic Endeavor
The Identity Behind the Mask - Who is Ghostface?
When we talk about Ghostface, we're actually talking about a character that's a bit different from your usual movie villain. It's not just one person, but a sort of shared identity, a kind of spooky costume worn by different people throughout the Scream film series. This makes the character extra chilling, since you never quite know who's behind the mask this time around, you know.
The look of Ghostface is pretty specific: a long, flowing black cloak and that very distinct, stretched-out, white mask with its wide, dark eyes and a sort of open, screaming mouth. It's a simple yet very effective design, really. This appearance helps the character stay mysterious and scary, no matter who is wearing the outfit in any given story. It’s a pretty clever way to keep things fresh, too it's almost.
The character, when appearing as Ghostface, often doesn't speak much directly, or at all. Instead, the voice you hear is usually distorted and used over the phone, adding to the unsettling feeling. This silence, combined with the sudden, quick movements and the general air of dread, makes Ghostface a truly memorable figure in scary movies. It's all part of what makes the character so impactful, as a matter of fact.
Ghostface - Character Details
The Ghostface persona is a truly fascinating element of the Scream film collection. It is, in a way, a costume that has been put on by a number of different individuals over time, each with their own reasons for doing so. This shared identity is a big part of what makes the character so enduring and, frankly, quite scary. You're never quite sure who the person underneath the mask might be, which keeps you guessing, you know.
The character's primary look is, of course, that very specific mask. It has a stretched, almost melted appearance, with dark, hollowed-out eyes and a wide, open mouth that looks like it's caught in a silent scream. This mask is usually paired with a long, dark robe that helps to hide the wearer's body shape, adding to the mystery and making the figure seem taller and more imposing. It’s a pretty effective disguise, basically.
A key trait of the Ghostface character is its tendency to be mostly silent when seen in person. The voice associated with Ghostface is almost always heard through a phone, often in a changed, electronic tone. This separation of voice from body adds to the creepiness and helps create a feeling of detachment. It's a very clever way to build suspense, really, making the character feel both close and far away at the same time. This approach has certainly helped cement Ghostface's place as a memorable figure in popular culture, as a matter of fact.
Getting Ready to Draw - What You'll Need to how to draw ghost face
Before you begin putting lines on paper, it's a good idea to gather a few simple things. You don't need a whole lot of special art tools to get a good looking Ghostface picture. What you have around the house might be just fine, you know. The goal here is to make drawing fun and easy, not to make you go out and buy a bunch of expensive stuff, really.
At a minimum, you'll want some paper – any kind will do, from a plain sheet of printer paper to a sketchpad. Then, you'll need a pencil. A regular number two pencil is perfectly good for starting out. You might also want an eraser, because everyone makes little adjustments as they go, and that's totally okay. It’s all part of the process, basically.
If you're feeling a bit more adventurous, or if you have them handy, you could also grab some darker pencils for shading, or even a black marker or crayon to fill in areas later. But honestly, just a pencil and paper are more than enough to start creating your own version of this famous character. It's about getting those first shapes down, as a matter of fact.
For those who prefer working on a screen, there are also some great online drawing applications that are free to use. These can be a fantastic way to try out digital art without needing special software. They often let you save your work in popular picture formats like JPEG or PNG, which is pretty handy. So, you have options, you know.
Starting Your Sketch - How to Begin how to draw ghost face
Beginning any drawing can feel a little bit like looking at a blank page and wondering where to put the first mark. But with Ghostface, we can break it down into easy, manageable steps. We'll start with the biggest shapes first, then add the smaller details. This approach helps build the drawing piece by piece, making it feel much less intimidating, you know.
The key to getting a good likeness is to pay attention to the overall form before getting lost in the little things. Think about the general shape of the mask and the way the cloak frames it. These are the main parts that give Ghostface its unique appearance. It's like building a house; you start with the foundation, as a matter of fact.
We'll begin by lightly sketching the main outline of the head, almost like a big egg or a slightly squashed oval. This initial shape doesn't need to be perfect; it's just a guide. You can always refine it later. This first step is just about getting something down on the paper to work with, really. It helps you get a feel for the space, too it's almost.
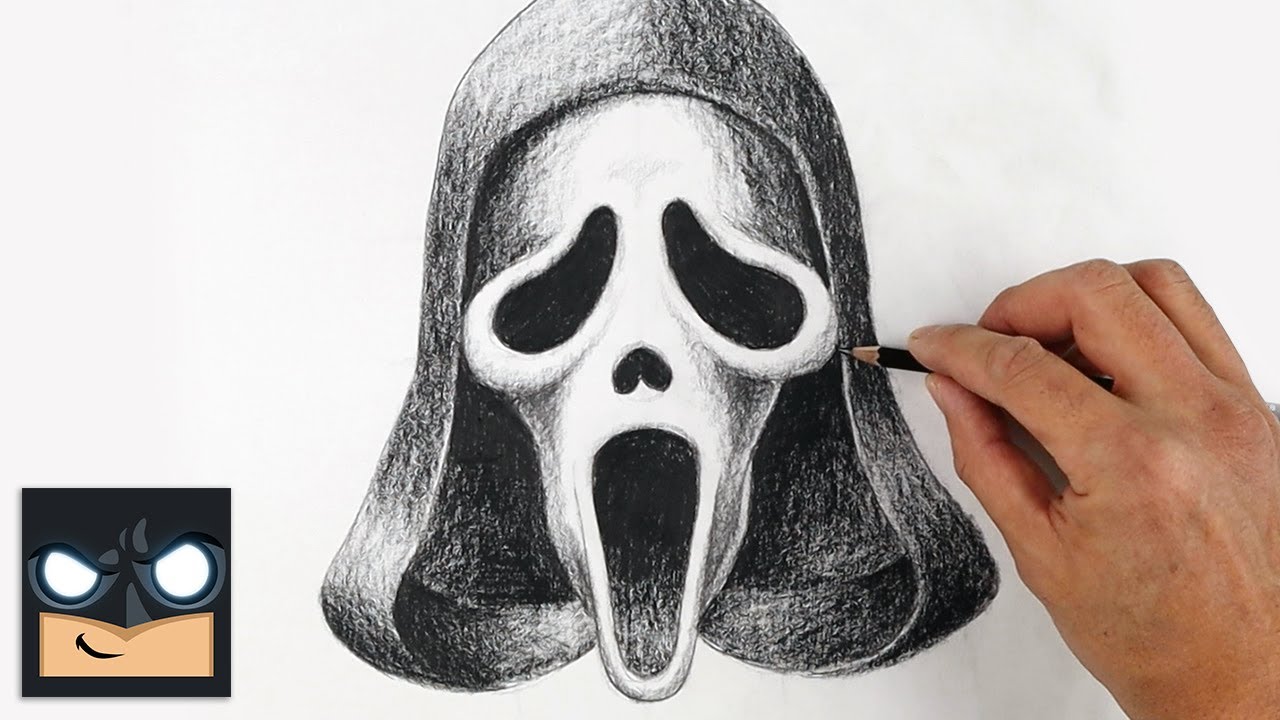
Creating the Head's Basic Shape
To begin putting together your Ghostface picture, you'll want to start with the main outline of the head. Think of it as drawing a big, somewhat uneven oval or a shape that's a bit like a stretched egg. This doesn't need to be perfectly round or symmetrical, since the mask itself has a slightly distorted, creepy look, you know. You are just trying to capture the general size and placement on your paper, as a matter of fact.
Make sure to draw this first shape very lightly. You'll likely want to adjust it as you go, and light lines are easy to erase or draw over. This initial outline acts as the boundary for the whole face, so give it enough room on your paper. It's the foundation for everything else you'll add, really. Don't press down too hard with your pencil, just a gentle touch will do, you know.
Consider the overall height and width of the mask. It's longer than it is wide, and it has a somewhat droopy appearance at the bottom. Try to capture that general feeling in your initial light sketch. This step is about getting the proportions right before you add any of the more specific features. It's a pretty important first move, too it's almost.
Shaping the Mouth Opening
Once you have the general shape of the head down, your next step is to add that very distinct, large opening for the mouth. This is a key part of the Ghostface mask's unsettling look. It's not just a simple slit; it's a wide, almost screaming void. You'll want to place this roughly in the lower middle part of the head shape you've already sketched, you know.
To create this, start by drawing a broad, somewhat uneven oval or a stretched-out, irregular shape. Think of it as a gaping hole rather than a neatly formed mouth. The edges can be a little bit ragged or wavy, which helps give it that eerie, almost melted appearance that the mask has. It's about capturing that feeling of a wide, dark space, as a matter of fact.
You can then refine the edges of this opening, making them a little sharper or more defined in certain spots. Remember, it’s meant to look like a silent scream, so it should convey a sense of distress or horror. This particular feature really gives the mask its character, so take your time with it. It’s a pretty important detail, too it's almost.
Adding the Cloak - How to Draw the Gown for how to draw ghost face
After you have the head and mouth shape in place, the next big piece to add is the flowing gown or cloak that Ghostface wears. This dark fabric surrounds the head, adding to the character's mysterious and imposing presence. It's not just a simple piece of clothing; it's part of the overall silhouette that makes Ghostface so recognizable, you know.
Start by drawing lines that extend downwards and outwards from the sides and bottom of the head outline. Think about how fabric would drape and fold. The cloak often has a somewhat jagged or tattered look at the bottom, and it billows out, giving the impression of movement. Don't make the lines too stiff; let them flow a bit, as a matter of fact.
You'll want to make sure the cloak appears to completely cover the body, leaving only the mask visible. This helps maintain the anonymity of the character. You can add some soft, curving lines within the cloak to suggest folds and shadows, giving it a bit of depth. This step really helps to frame the face and complete the iconic look. It’s a pretty important part of the overall picture, too it's almost.
Bringing it to Life - Adding Details and Finishing how to draw ghost face
Once the main shapes of the head, mouth, and cloak are in place, it's time to add the smaller details that truly bring your Ghostface drawing to life. These are the touches that make it look less like a collection of shapes and more like the chilling character we know. It's about refining what you have and making it pop, you know.
Focus on the eyes next. They are usually dark, hollowed-out shapes above the mouth opening. They should look empty and without expression, adding to the mask's unsettling nature. You can make them simple, dark ovals or slightly irregular shapes. It's about creating a feeling of a vacant stare, as a matter of fact.
You might also want to add some light shading to give the mask a bit of dimension. The Ghostface mask isn't perfectly flat; it has subtle curves and depressions. A little bit of shading, especially around the edges of the mouth and eyes, can make it appear more three-dimensional. This is where simple shapes and shading really come into play to give the drawing depth. It’s a pretty effective way to add realism, too it's almost.
Putting Color on Your Ghostface Picture
After you've got all the lines and shapes in place for your Ghostface drawing, you might want to add some color. While the character is largely black and white, adding color can really make your picture stand out and give it a finished look. This step is pretty straightforward, you know.
The mask itself is typically a stark white, but you can use a very light gray or even just leave it the color of your paper if you prefer. The most striking part to color is the cloak, which is a deep, dark black. You can use a black crayon, marker, or even a dark pencil to fill in the areas of the gown. Make sure to color evenly for a smooth look, as a matter of fact.
For the eyes and the mouth opening, these areas are usually very dark, almost completely black, to give that hollowed-out appearance. You can use your darkest pencil or a black marker for these parts. Adding these dark areas really helps to create the spooky contrast that Ghostface is known for. It’s a pretty simple step that makes a big difference, too it's almost.
Tips for Your Drawing Journey - How to improve how to draw ghost face
Drawing, like any skill, gets better with practice. Whether you're just starting out or have been sketching for a while, there are always ways to improve and make your drawings even more expressive. Don't worry if your first attempt isn't exactly what you imagined; every artist starts somewhere, you know.
One good way to get better is to keep practicing those basic shapes and shading techniques. The Ghostface mask, for instance, relies on simple shapes and the right amount of shadow to look convincing. The more you play around with these fundamental ideas, the easier it will be to draw anything you want, as a matter of fact.
There are lots of places to find help and inspiration. Online video channels, like the Cartooning Club Channel, often have drawing guides for all sorts of characters, whether you're a beginner or have some experience. Watching how others approach a drawing can give you new ideas and ways to think about your own work. It’s a pretty helpful way to learn, too it's almost.
You can also find free online drawing tools that let you create digital artwork. Some of these, like Sketchpad, are very user-friendly and let you draw, edit pictures, or even design simple things like business cards. They often have neat features like drag-and-drop for quick photo edits or shortcuts for different tools. For example, on Sketchpad, you can draw the letter "S" to quickly open the style chooser, or tap the screen with different finger combinations while holding a button to get to tool presets. These digital tools can be a fun way to try out different styles and effects without needing physical supplies, you know. They are quite versatile, as a matter of fact, allowing you to craft images for social media posts, digital ads, paper, or even apparel.
Don't be afraid to experiment with different art materials too. Pencils are great, but you might find you enjoy working with charcoal, pastels, or even digital pens. Each material has its own feel and can give your drawings a different look. The key is to keep trying new things and see what you enjoy most. It’s a pretty open field, really, so explore what feels good, you know.
Finally, remember that drawing is supposed to be enjoyable. Don't put too much pressure on yourself to create a perfect picture every time. The act of creating, of putting your ideas onto paper or a screen, is valuable in itself. Every line you draw, every shape you make, is a step in your artistic journey. Just keep at it, and you'll see your skills grow over time. It’s a pretty rewarding activity, too it's almost.
Final Thoughts on Your Artistic Endeavor
You've now got a good idea of how to put together your own Ghostface drawing, from getting the basic head shape down to adding the cloak and even coloring it in. We've talked about the character's unique identity, what you might need to start sketching, and some ways to make your drawing look its best. We also looked at how online tools can help you along the way, you know.
Remember that drawing is a skill that gets better with consistent effort. Each time you pick up a pencil or open a drawing app, you're building on what you've learned before. Don't be shy about making adjustments or trying different approaches. It's all part of the process of creating something you're happy with, as a matter of fact.
So, go ahead and give it a try. Whether you're aiming for a realistic picture or a more cartoon-like version, the steps we've covered should give you a solid starting point. Have fun with it, and enjoy seeing your very own Ghostface come to life on the page. It’s a pretty cool thing to create, too it's almost.